Description
| Product Name: | Monkey MIγ/CXCL9 (Monocyte Interferon Gamma Inducing Factor) ELISA Kit |
| SKU: | AEES01984 |
| Size: | 24T/96T |
| Reactivity: | Monkey |
| Synonyms: | MIγ, CXCL9, Monocyte Interferon Gamma Inducing Factor |
| Assay Type: | Sandwich |
| Sensitivity: | 0.09 ng/mL |
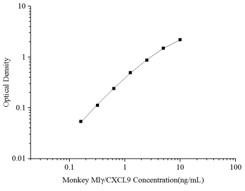
| Range: | 0.16-10 ng/mL |
| Standard: | 10 ng/mL |
| Assay Length: | 3.5h |
| Sample Type: | Serum, plasma and other biological fluids |
| Kit Components: |
|
The Assay Genie Monkey MIγ/CXCL9 (Monocyte Interferon Gamma Inducing Factor) ELISA Kit is a highly sensitive assay for the quantitative measurement of Monkey MIγ/CXCL9 in the following samples: serum, plasma and other biological fluids.
This kit utilizes a sandwich enzyme-linked immunosorbent assay (ELISA) format. An antibody specific to the target protein is pre-coated onto the wells of a 96-well microplate. Samples and standards are added to the wells, allowing the target to bind to the immobilized antibody. After incubation, a biotinylated detection antibody is then added, which binds specifically to the captured target. Following a wash step to remove excess detection antibody, HRP-conjugated Streptavidin is introduced, forming a biotin-streptavidin-HRP complex. After a second washing step, Substrate Reagent is added to initiate a colorimetric reaction catalyzed by HRP. The reaction produces a blue product that turns yellow upon addition of the acidic Stop Solution.
The optical density (OD) is measured at 450 nm using a microplate reader. The OD450 value is directly proportional to the concentration of the target analyte in the sample, which can be determined by referencing a standard curve.
This dual function kit includes validated Bradford Reagent to quantify total protein concentration for accurate sample normalization.
| Precision: |
| |||||||||||||||||||||||||||||||||||||||||||||
| Recovery: |
| |||||||||||||||||||||||||||||||||||||||||||||
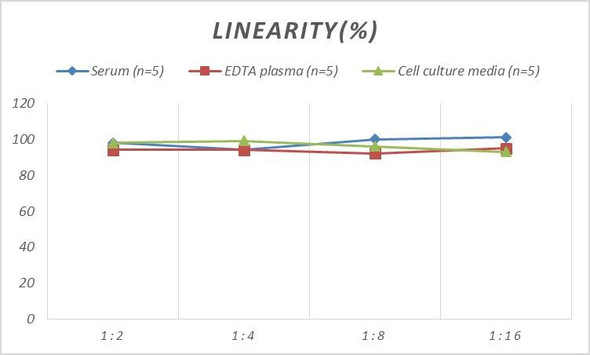
| Linearity: |
| |||||||||||||||||||||||||||||||||||||||||||||
*Note:The below protocol is a sample protocol. Protocols are specific to each batch/lot. For the correct instructions please follow the protocol included in your kit.
| Step | Protocol |
| 1. | Plate Setup: Set standard, test sample and control (zero) wells on the pre-coated plate and record their positions. It is recommended to measure each standard and sample in duplicate. Dispense all solutions directly to the bottom of the plate wells, avoiding contact with the well walls and preventing foaming. |
| 2. | Standard, Samples & Control Loading: Aliquot 100 µl of standard working solution or samples and controls into the designated wells. |
| 3. | First Incubation: Seal the plate with a cover and incubate at 37°C for 90 mins. |
| 4. | Aspirate: Aspirate the liquid from each well, DO NOT wash. |
| 5. | Biotin-labelled Antibody Addition: Add 100 µl of Biotin-labelled Antibody working solution to the bottom of each well (standard, test sample & zero wells) without touching the side walls. |
| 6. | Second Incubation: Seal the plate with a cover and incubate at 37°C for 60 mins. |
| 7. | Washing: Aspirate or decant the solution from the plate and add 350 µL of wash buffer to each well and incubate for 1-2 minutes at room temperature. Aspirate the solution from each well and clap the plate on absorbent filter paper to dry. Repeat this process 3 times. |
| 8. | HRP Conjugate Working Solution Addition: Add 100 µL of HRP Conjugate working solution to each well. |
| 9. | Third Incubation: Cover with a plate seal and incubate for 30 min at 37°C. |
| 10. | Wash: Aspirate or decant the solution from each well. Repeat the wash process five times as conducted in step 7. |
| 11. | Substrate Reagent Addition and Colour Development: Add 90 µl of Substrate Reagent into each well, cover the plate and incubate at 37°C in dark for 10-20 mins. (Note: This incubation time is for reference only, the optimal time should be determined by the end-user. DO NOT exceed 30 minutes.) |
| 12. | Stop Reaction: Add 50 µl of Stop solution into each well and mix thoroughly. The colour changes into yellow immediately. Stop solution addition should be done in the same order as the substrate solution. |
| 13. | OD Measurement: Read the O.D. absorbance at 450 nm in a microplate reader immediately after adding the stop solution. |
The procedures outlined in this document are provided as general recommendations for sample preparation in ELISA assays. Due to the variability of biological samples and specific assay requirements, users are advised to optimize protocols based on their own experimental conditions.
| Sample Type | Protocol |
| Serum | Allow whole blood to coagulate at room temperature (2 h) or 2-8°C overnight. Centrifuge at 1000 × g for 20 min and collect the supernatant. Store or use immediately. |
| Plasma | Collect in anticoagulant tubes (EDTA, citrate, or heparin), mix gently, and centrifuge within 30 min at 1000 × g, 2-8°C for 15 min. Store or assay as needed. |
| Tissue homogenates | Avoid buffers containing NP-40, Triton X-100, or DTT, as these strongly inhibit the assay. We recommend using 50 mM Tris + 0.9% NaCl + 0.1% SDS, pH 7.3. 1. Place the target tissue on ice, rinse with pre-cooled PBS buffer (0.01 M, pH 7.4) to remove residual blood and weigh the tissue. 2. Homogenize the tissue on ice using an appropriate lysis buffer. The lysate volume should correspond to the tissue weight; typically, 9 mL PBS is used per 1 g of tissue. It is recommended to add protease inhibitors to the PBS (e.g., 1 mM PMSF). 3. Further disrupt the tissue using ultrasonic homogenization (keep samples on an ice bath during sonication) or freeze-thaw cycles (repeat twice for effective lysis). 4. Centrifuge the homogenate at 5000 × g for 5 minutes. Collect the supernatant for immediate analysis, or aliquot and store at -20°C or -80°C for future assays. 5. Determine total protein concentration using the Bradford Reagent included in this kit. For ELISA assays, the total protein concentration should generally be 1-3 mg/mL. Note: Tissues with high endogenous peroxidase levels (e.g., liver, kidney, pancreas) may react with TMB substrate, causing false positives. If this occurs, treat samples with 1% H₂O₂ for 15 minutes before repeating the assay. |
| Cell culture supernatant | Centrifuge the sample at 2500 rpm for 5 minutes at 2-8°C. Carefully collect the clarified cell culture supernatant for immediate analysis, or aliquot and store it at -80°C for future assays. |
| Suspension cell lysates | Centrifuge the cell suspension at 2500 rpm for 5 minutes at 2-8°C and collect the cell pellet. Wash the pellet with pre-cooled PBS (0.01 M, pH 7.4) and mix gently. Repeat centrifugation and discard the supernatant. Add 0.5-1 mL of cell lysis buffer containing an appropriate protease inhibitor (e.g., PMSF, final concentration: 1 mM). Lyse the cells on ice for 30-60 minutes or disrupt them using ultrasonic homogenization. Centrifuge the lysate at 10,000 rpm for 10 minutes at 2-8°C and collect the supernatant for immediate use, or aliquot and store at -80°C. |
| Adherent cell lysates | Remove the supernatant and wash the cells three times with pre-cooled PBS. Add 0.5-1 mL of cell lysis buffer supplemented with an appropriate protease inhibitor (e.g., PMSF at a final concentration of 1 mmol/L). Scrape the adherent cells using a cell scraper and transfer the cell suspension to a centrifuge tube. Lyse the cells on ice for 30-60 minutes, or disrupt the cells by ultrasonic treatment. Centrifuge the lysate at 10,000 rpm for 10 minutes at 2-8°C and collect the supernatant for immediate use, or aliquot and store at -80°C. |
| Sample storage | Short-term: 2-8°C for up to 5 days. Medium-term: -20°C for up to 6 months. Long-term: -80°C or cryopreservation in liquid nitrogen. Frozen samples should be thawed rapidly in a 15-25°C water bath to minimize ice crystal-induced damage. Thawed samples can be analyzed immediately or stored temporarily at 2-8°C. Repeated freeze-thaw cycles should be strictly avoided due to their detrimental effect on protein stability. |
| Other sample types | For more information about how to process other sample types (e.g., body fluids, breast milk & more), please contact our Tech Support Team at techsupport@assaygenie.com. |