Sonication Protocol for Cell Lysis
Sonication Protocol for Cell Lysis – Steps & Optimization
A step-by-step sonication protocol for disrupting mammalian and bacterial cells — with buffer recipes, probe-versus-bath guidance and optimization tips to protect your protein — plus the validated lysis buffers and detection kits to take you from lysate to result.
Browse Western Blotting Reagents →Sonication Protocol for Cell Lysis
Discover the role of sonication in laboratory research, a process using ultrasonic energy for cell disruption and sample preparation, essential for various biological applications.
Key Takeaways:
- Sonication uses sound energy to agitate particles in samples, primarily for cell disruption.
- It's key for preparing protein extracts, DNA shearing, and nanoparticle production.
- Different protocols exist for sonication, tailored to specific sample types like proteins and bacteria.
- Key tips include keeping samples cool, pulsing to reduce heat, and avoiding over-sonication.
What is Sonication?
Sonication applies sound energy to agitate particles in your sample. The ultrasonic frequency used is usually greater than >20 kHz. In an experimental setting this is usually carried out using an ultrasonic bath or ultrasonic probe generally referred to as sonication.
Reagents for cell lysis, sample prep & detection
Assay Genie supplies validated lysis buffers, loading buffers, protein quantification assays and complete western blot detection kits to take you from cell pellet to publication-ready data.

GenieLyse RIPA Lysis Buffer
Ready-to-use RIPA buffer for lysing cells and extracting total protein.
View product
Cell Lysis Buffer (ELISA & Western Blot)
Rapid lysis solution for tissue and cell samples suited to ELISA and western blot.
View product
5X SDS Loading Buffer
Denaturing loading buffer to prepare sonicated lysates for SDS-PAGE.
View product
Lysis-to-Result Western Blotting Detection Kit II
High-sensitivity detection kit taking you from lysate to visualised blot.
View product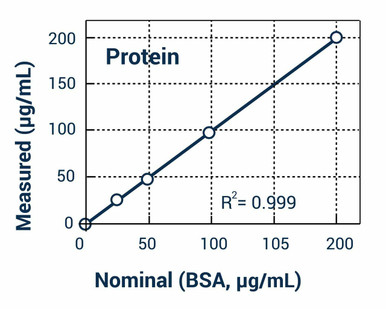
Total Protein Assay Kit
Fluorometric o-phthalaldehyde assay quantifying nanograms of protein.
View product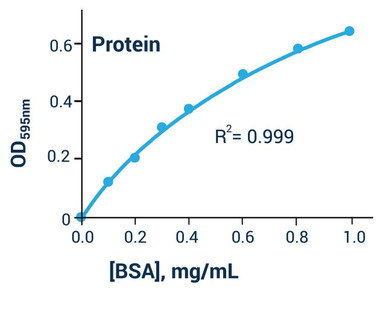
Bradford Protein Assay
Coomassie Blue G "mix-and-read" assay to normalise your lysate concentration.
View productSonication Protocol Overview
In the laboratory sonication is used mainly as a method of cell disruption. Sonication is used to disrupt cellular membranes and release the cells contents, this process is generally referred to as sonoporation. Sonication is carried out during the preparation of protein extracts in order to break the cell apart. Although lysis buffer can be used sonication can help break the cell apart. Sonication can also be used to fragment/shear DNA, preventing it from interfering with further sample preparation. Other biological uses include the production of nanoparticles, liposomes, extraction of anthocyanins and antioxidants.
Depending on your cell type (bacterial or eukaryotic) it can be difficult to lyse certain cell types and placing them in a detergent buffer alone wont result in full cell lysis. Furthermore you may also require to lyse the cellular organelles and not just lyse the cell wall to release the cytosol. Sonication of cells using a titanium probe can help lyse cells fully and help all extract all DNA, RNA and protein contents of your cells. This can help downstream when looking for more homogenous extract for ELISA assays and immunoprecipitation.
If you follow the sonication protocol below for cell lysis you should achieve efficient lysis of your cells for your required application. Good lysates are the foundation of a clean blot — pair this method with our guide to western blot sample preparation for downstream success.
RIPA Buffer Recipe & Sample Preparation
RIPA Buffer
| 50mM Tris HCL pH 7.4 |
| 50 mM NaCl |
| 2mM EDTA |
| 1% SDS |
| Plus freshly added proteinase Inhibitors (Apoprotein, Leupeptin, DTT and PMSF) |
Sample Preparation Pre-sonication
| # | Step |
|---|---|
| 1. | Wash cells with ice cold PBS. |
| 2. | Aspirate PBS. |
| 3. | Scrape adherent cells off the plate using your sterile pipette tip. |
| 4. | Suspend cells in ice cold PBS. |
Sonication Protocol for Protein Extraction
| Step | Description |
|---|---|
| 1. | Centrifuge cells for 5 mins at 270 x g in a microcentrifuge. |
| 2. | Aspirate the remaining media and resuspend cells in 30 – 100 μL of RIPA buffer. |
| 3. | Incubate the pellet on ice for 30 min. |
| 4. | Sonicate the samples as follows. |
| 5. | Place the sonicator probe at a frequency of 20 kHz. |
| 6. | Place the cells in a 1.5 mL microcentrifuge tube and gently move under the tip of the sonicator probe. |
| 7. | The probe will begin to vibrate the buffer for 2 X 10 sec. (This may result in foaming of the samples) |
| 8. | In this protocol however foaming of the samples was not shown to be a problem following sonication when we carried on to immunoprecipitation, Western Blotting or ELISA assays. |
| 9. | Depending on samples and viscosity of the samples, cells can be sonicated again for a further 10 s . |
| 10. | Once the samples are sonicated incubate on ice for 5 min. |
| 11. | Centrifuge at 10,000 x g for 20 min to pellet debris (Debris may contain un-lysed cells, nuclei or un-lysed organelles). |
| 12. | Transfer the supernatants to a new microcentrifuge tube and label. |
| 13. | Store at -20 °C. |
Bacteria Sonication Protocol
| Step | Description |
|---|---|
| 1. | Sarkosyl lysis of BL21 cells and the removal of chaperone proteins BL21 bacterial pellets were resuspended in 50 ml of ice cold Sodium Tris-EDTA (STE) buffer (10 mM Tris-HCL, pH 8.0, 1 mM EDTA, 150 mM NaCl supplemented with 100 mM PMSF). |
| 2. | Add 500 ul of Lysozyme (10 mg/ ml) and incubate on ice for 15 min. |
| 3. | Add 500 ul of DTT and 7 ml of Sarkosyl (10% (w/v) made up in STE buffer). |
| 4. | All purification buffers must be kept ice cold and samples maintained on ice. All purification steps were carried out in the cold room where possible. |
| 5. | Sonicate samples for 3 x 30 sec with a 2 min interval between each sonication. |
| 6. | Place samples on ice for further purification steps or store at -80 °C. |
Sonication Hints and Tips
- Always keep your samples on ice. The energy from the sonicator which causes your sample to break apart also heats it up. If your sample get too hot the protein will start to degrade. In order to prevent this try to keep your sample on ice at all times, before, after and during if possible.
- Reduce the temperature of your sample by pulsing. Most sonicators have a pulse mode which reduces the heating up of your sample during sonication. If pulsing is not an option/not available turn the sonicator on for 5 seconds and then off. Repeat as many times as necessary.
- Don't over-Sonicate. Sonicating your sample for too long can degrade your protein. Finding that perfect balance may take some optimisation and can vary for different cell/tissue types and sample volumes.
- Sample Volume and probe size. The probe you use can vary depending on your sample size. Each probe has a recommended sample volume range. Small tips (microtips) are recommended for processing samples inside small, thin vessels and never samples larger than 50ml. Microtips are made for short processing times. Microtips will generate a considerable amount of heat in small volumes and therefore should be used in the pulse mode to prevent heat build-up.
- Protect your ears. Although sonication is ultrasonic and out of the range of human hearing the the collapse of tiny cavitation bubbles created by the sonication creates a loud screeching noise. I suggest wearing some proper ear protection, covering your ears simply wont cut it here.
- Try to limit foaming. If your probe isn't submerged properly in your sample it can lead to foaming, however if its too deep you wont get proper lysis. If you do get some foaming don't panic, I found that foaming wasn't a problem when I carried on to immunoprecipitation, Western Blotting or ELISA assays.
- Slow and steady wins the race when it come to amplitude. As with all experiments the temptation to crank up your western to maximum voltage or transform your cells in half the time is strong – this doesn't however always result in presentable never mind publishable results. For sonication a lower amplitude for longer will reduce heating of the sample – within reason you do have other experiments to get on with. Amplitude and intensity have a direct relationship. In order to be able to reproduce results, the amplitude setting, temperature, viscosity and volume of the sample are all parameters that need to remain consistent. The amplitude, not the power, is most critical when trying to reproduce sonication results.
- Always clean the sonicator tip between samples. Cleaning the sonicator tip is critical in limiting protein carryover. Wiping the sonicator probe with 70 %ethanol or sonication of ethanol in a beaker is an effective way of cleaning the sonicator tip.
What Is Sonication for Cell Lysis?
Sonication is a mechanical cell disruption technique that uses ultrasonic waves (typically 20–40 kHz) to break cell membranes and release intracellular contents. The process relies on acoustic cavitation—the formation and collapse of microscopic bubbles that generate localized shear forces disrupting lipid bilayers. This method is particularly valuable for protein extraction, DNA/RNA isolation, and producing cell-free lysates for biochemical assays.
What Is the Difference Between Probe and Bath Sonication?
| Parameter | Probe Sonicator | Bath Sonicator |
|---|---|---|
| Power Output | High (50–500 W), direct energy | Low-moderate (100–300 W), dispersed |
| Sample Volume | Small (0.5–50 mL) | Large (up to several liters) |
| Sample Contact | Direct probe contact | Indirect; container within sonic field |
| Heat Generation | High; requires cooling intervals | Moderate; slower heating |
| Best For | Focused lysis, small samples | Batch processing, larger volumes |
How Do You Optimize Sonication Parameters?
Start with 20–40% amplitude for mammalian cells, increasing to 50–70% for bacterial or yeast cells. Use pulse cycles of 15 seconds on / 5 seconds off to prevent protein denaturation. For typical cell suspensions, 3–5 minutes total sonication time achieves good lysis. Monitor sample temperature continuously; keep it below 4°C by using ice baths. Adjust total time and amplitude based on cell type and sample volume.
What Buffer Should You Use for Sonication?
| Buffer | Components | Best For |
|---|---|---|
| RIPA Buffer | 50 mM Tris-HCl (pH 7.4), 150 mM NaCl, 1% NP-40, 0.5% sodium deoxycholate, 0.1% SDS | Mammalian cell total protein extraction |
| NP-40 Buffer | 50 mM Tris-HCl, 150 mM NaCl, 1% NP-40, protease inhibitors | Gentle lysis; cytoplasmic vs. nuclear fractions |
| Triton X-100 Buffer | 50 mM Tris-HCl, 150 mM NaCl, 1% Triton X-100, 2 mM EDTA | Nucleoprotein and membrane protein extraction |
Always include protease inhibitors (aprotinin, leupeptin, PMSF) and keep all buffers ice-cold. Once you have a clean lysate, quantify it with a Bradford protein assay before loading your gel.
What Is the Difference Between Sonication and Other Cell Lysis Methods?
| Method | Mechanism | Advantages | Limitations |
|---|---|---|---|
| Sonication | Acoustic cavitation | Rapid, scalable, good protein extraction | Heat generation if not controlled |
| Enzymatic | Lysozyme/cellulase digestion | Gentle, cell-type selective | Slow, enzyme cost |
| Chemical | Detergent disruption | Simple, room temperature | Can denature proteins |
| French Press | High-pressure extrusion | Very gentle for sensitive proteins | Slow, expensive equipment |
| Bead Beating | Mechanical bead friction | Effective for tough-walled cells | Hard to control intensity |
Preparing samples for western blot?
From lysis buffers and loading buffers to complete lysis-to-result detection kits, Assay Genie's western blotting reagents give you validated, publication-ready data — with expert technical support from our PhD team.
Explore Western Blotting Reagents →Frequently Asked Questions About Sonication
What power setting should I use for sonication?
Start with 20–30% amplitude for mammalian cells (HEK293, HeLa). Increase to 50–60% for bacterial cells and 60–70% for yeast or plant cells with rigid walls. Always test on a small pilot sample first.
How do I prevent protein degradation during sonication?
Keep samples on ice and use pulse cycles (15 seconds on, 5 seconds off). Include protease inhibitors and store lysates at −80°C immediately after centrifugation.
Can sonication be used for mammalian cells?
Yes, sonication is highly effective for mammalian cell lysis. Most cell lines lyse completely within 3–5 minutes at 20–40% amplitude. Mammalian cells lack rigid walls, making them susceptible to acoustic cavitation.
How long should I sonicate bacterial cells?
Bacterial cells typically require 5–10 minutes total at 50–70% amplitude in 15-second pulses. Gram-positive bacteria (thicker peptidoglycan) need longer than Gram-negative. Verify lysis under a microscope.
What is the difference between sonication and homogenization?
Sonication uses ultrasonic waves and cavitation, while homogenization uses mechanical grinding. Sonication offers finer control and works better for single-cell suspensions; homogenization works well for tissue samples.